Continued from Electric bike build part 5.
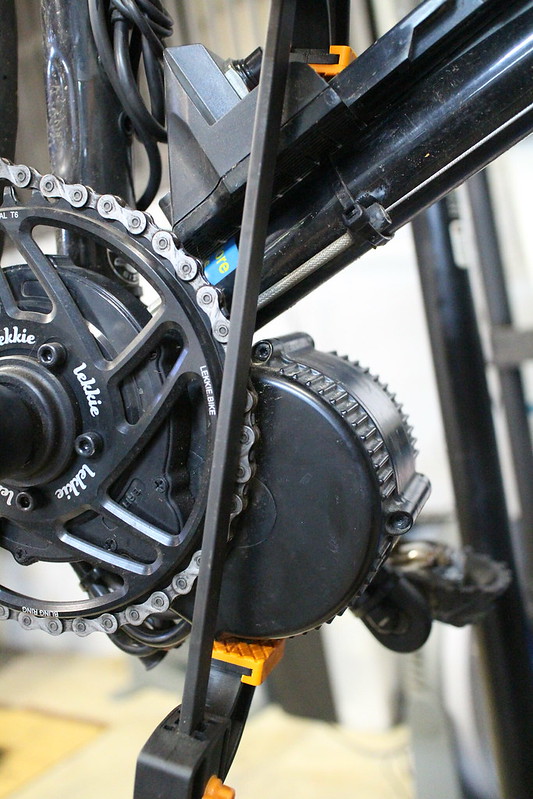
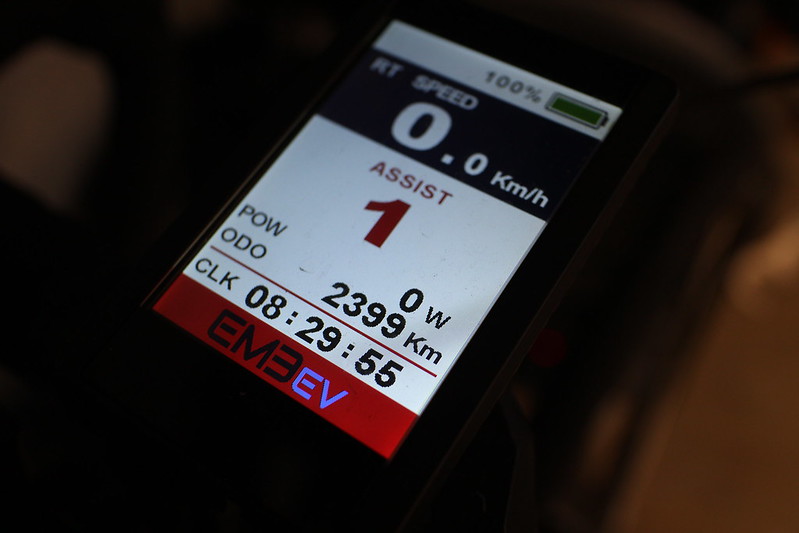
My electric bike has almost hit 2,400km and only just now has required another re-torque of the motor. I haven't had any other issues other than a bit of rubbing from the 28mm tyres - it's really touch and go with this frame and I've been told the GP4000 tyres are fatter than advertised.
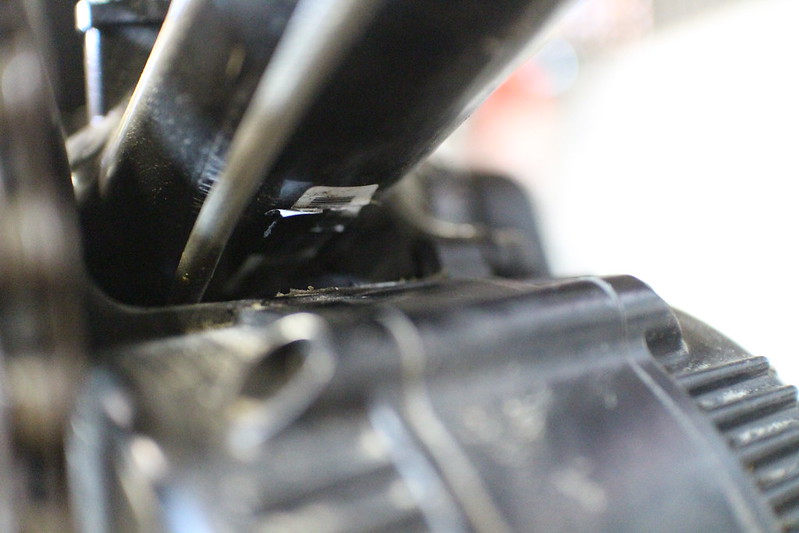
It looks like the rubber has been completely wiped out by motor movement:
A clamp came in handy to hold the motor in place while doing the re-torque:
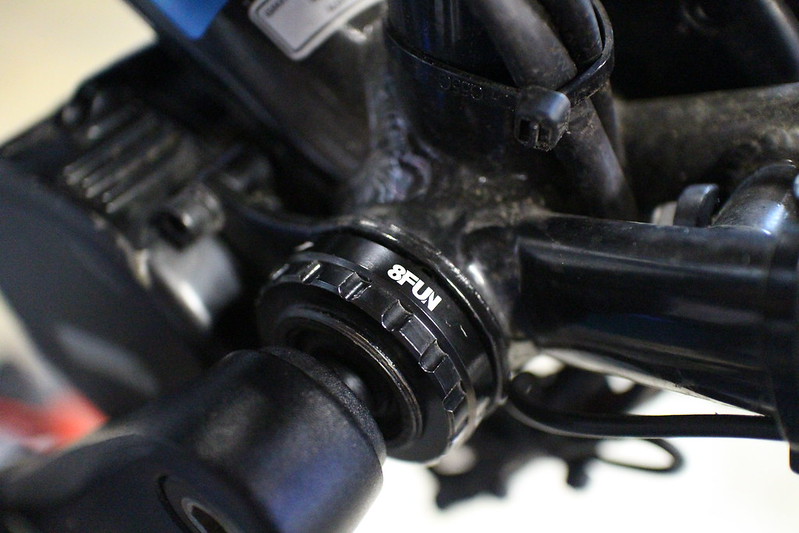
Thread locker applied again to both rings:
I used the spanner through an old shirt to keep the alloy lock ring looking pretty:
I still think it's an awesome machine and a great way to commute! No regrets!
All I can think of is if I had to do it all over again I'd look at a bike with disc brakes and a bit more clearance for wider tyres so I can run lower pressures, but I'm in no rush to make the change.
Sunday, 25 November 2018
Wednesday, 12 September 2018
Plex hardware accelerated transcoding within LXC
I run Plex Media Server within an LXC container on my NAS. The NAS itself is a QNAP TS-251+ but it is running Debian 9. I have all the functions I use separated into individual LXC containers.
Plex runs quite well considering the low powered Celeron J1900 processor, but it does tend to struggle with HD transcoding. I managed to get GPU assisted transcoding working this evening which appears to help considerably!
Here are the requirements:
https://support.plex.tv/articles/115002178853-using-hardware-accelerated-streaming/
Fortunately the Celeron J1900 supports Intel Quick Sync Video.
First of all I checked the host could see the DRI stuff:
tim@host:~$ journalctl
Jul 16 21:29:30 jupiter kernel: [drm] Initialized i915 1.6.0 20160919 for 0000:00:02.0 on minor 0
tim@host:~$ ls -l /dev/dri
total 0
crw-rw---- 1 root video 226, 0 Jul 16 21:29 card0
crw-rw---- 1 root video 226, 64 Jul 16 21:29 controlD64
crw-rw---- 1 root video 226, 128 Jul 16 21:29 renderD128
I then tried mapping the devices through to the container:
tim@host:~$ sudo vi /var/lib/lxc/plex/config
...
lxc.mount.entry = /dev/dri dev/dri none bind,create=dir 0 0
I restarted the container then installed the relevant driver and the vainfo program within it:
tim@plex:~$ sudo apt-get install i965-va-driver vainfo
Both the Plex user and my user were in the video group yet vainfo was just saying 'Abort' instead of giving any useful info. I did some further digging:
tim@plex:~$ strace vainfo
...
open("/dev/dri/renderD128", O_RDWR) = -1 EPERM (Operation not permitted)
open("/dev/dri/card0", O_RDWR) = -1 EPERM (Operation not permitted)
...
The container did not have permissions to talk to those devices.
I did a bit of reading on control groups and device numbers and came up with the following rule to allow the container to use any character device with a major number of 226 (Direct Rendering Infrastructure):
tim@host:~$ sudo vi /var/lib/lxc/plex/config
...
lxc.cgroup.devices.allow = c 226:* rw
lxc.mount.entry = /dev/dri dev/dri none bind,create=dir 0 0
After stopping and starting the container, I could now run vainfo successfully:
tim@plex:~$ vainfo
error: XDG_RUNTIME_DIR not set in the environment.
error: can't connect to X server!
libva info: VA-API version 0.39.4
libva info: va_getDriverName() returns 0
libva info: Trying to open /usr/lib/x86_64-linux-gnu/dri/i965_drv_video.so
libva info: Found init function __vaDriverInit_0_39
libva info: va_openDriver() returns 0
vainfo: VA-API version: 0.39 (libva 1.7.3)
Plex runs quite well considering the low powered Celeron J1900 processor, but it does tend to struggle with HD transcoding. I managed to get GPU assisted transcoding working this evening which appears to help considerably!
Here are the requirements:
https://support.plex.tv/articles/115002178853-using-hardware-accelerated-streaming/
Fortunately the Celeron J1900 supports Intel Quick Sync Video.
First of all I checked the host could see the DRI stuff:
tim@host:~$ journalctl
Jul 16 21:29:30 jupiter kernel: [drm] Initialized i915 1.6.0 20160919 for 0000:00:02.0 on minor 0
tim@host:~$ ls -l /dev/dri
total 0
crw-rw---- 1 root video 226, 0 Jul 16 21:29 card0
crw-rw---- 1 root video 226, 64 Jul 16 21:29 controlD64
crw-rw---- 1 root video 226, 128 Jul 16 21:29 renderD128
I then tried mapping the devices through to the container:
tim@host:~$ sudo vi /var/lib/lxc/plex/config
...
lxc.mount.entry = /dev/dri dev/dri none bind,create=dir 0 0
I restarted the container then installed the relevant driver and the vainfo program within it:
tim@plex:~$ sudo apt-get install i965-va-driver vainfo
Both the Plex user and my user were in the video group yet vainfo was just saying 'Abort' instead of giving any useful info. I did some further digging:
tim@plex:~$ strace vainfo
...
open("/dev/dri/renderD128", O_RDWR) = -1 EPERM (Operation not permitted)
open("/dev/dri/card0", O_RDWR) = -1 EPERM (Operation not permitted)
...
The container did not have permissions to talk to those devices.
I did a bit of reading on control groups and device numbers and came up with the following rule to allow the container to use any character device with a major number of 226 (Direct Rendering Infrastructure):
tim@host:~$ sudo vi /var/lib/lxc/plex/config
...
lxc.cgroup.devices.allow = c 226:* rw
lxc.mount.entry = /dev/dri dev/dri none bind,create=dir 0 0
After stopping and starting the container, I could now run vainfo successfully:
tim@plex:~$ vainfo
error: XDG_RUNTIME_DIR not set in the environment.
error: can't connect to X server!
libva info: VA-API version 0.39.4
libva info: va_getDriverName() returns 0
libva info: Trying to open /usr/lib/x86_64-linux-gnu/dri/i965_drv_video.so
libva info: Found init function __vaDriverInit_0_39
libva info: va_openDriver() returns 0
vainfo: VA-API version: 0.39 (libva 1.7.3)
vainfo: Driver version: Intel i965 driver for Intel(R) Bay Trail - 1.7.3
vainfo: Supported profile and entrypoints
VAProfileMPEG2Simple : VAEntrypointVLD
VAProfileMPEG2Simple : VAEntrypointEncSlice
VAProfileMPEG2Main : VAEntrypointVLD
VAProfileMPEG2Main : VAEntrypointEncSlice
VAProfileH264ConstrainedBaseline: VAEntrypointVLD
VAProfileH264ConstrainedBaseline: VAEntrypointEncSlice
VAProfileH264Main : VAEntrypointVLD
VAProfileH264Main : VAEntrypointEncSlice
VAProfileH264High : VAEntrypointVLD
VAProfileH264High : VAEntrypointEncSlice
VAProfileH264StereoHigh : VAEntrypointVLD
VAProfileVC1Simple : VAEntrypointVLD
VAProfileVC1Main : VAEntrypointVLD
VAProfileVC1Advanced : VAEntrypointVLD
VAProfileNone : VAEntrypointVideoProc
VAProfileJPEGBaseline : VAEntrypointVLD
Monday, 7 May 2018
Jenkins on Kali 2017.1
Here's a quick run through of getting the Jenkins Pipeline demos working on Kali 2017.1 for testing purposes.
tim@kali:~$ curl -fsSL https://download.docker.com/linux/debian/gpg | sudo apt-key add -
If we try to use add-apt-respository we will get an error as Kali is not supported:
tim@kali:~$ sudo add-apt-repository "deb [arch=amd64] https://download.docker.com/linux/debian stretch stable"
aptsources.distro.NoDistroTemplateException: Error: could not find a distribution template for Kali/kali-rolling
We can instead manually add to /etc/apt/sources.list:
tim@kali:~$ sudo vi /etc/apt/sources.list
deb [arch=amd64] https://download.docker.com/linux/debian stretch stable
tim@kali:~$ sudo apt-get update
tim@kali:~$ sudo apt-get install docker-ce
tim@kali:~$ sudo adduser --disabled-password git
tim@kali:~$ sudo adduser --disabled-password jenkins
We want Jenkins to be able to utilise Docker without having to be root:
tim@kali:~$ sudo adduser jenkins docker
tim@kali:~$ sudo -u jenkins -i
jenkins@kali:~$ mkdir ~/jenkins && cd ~/jenkins
jenkins@kali:~/jenkins$ wget "http://mirrors.jenkins.io/war-stable/latest/jenkins.war"
jenkins@kali:~/jenkins$ java -jar jenkins.war --httpPort=8080
tim@kali:~$ sudo apt-get install git-core
tim@kali:~$ sudo systemctl start ssh
tim@kali:~$ sudo -u git -i
git@kali:~$ mkdir ~/.ssh ~/repo
git@kali:~$ chmod 0700 ~/.ssh
git@kali:~$ cd ~/repo
git@kali:~/repo$ git init --bare
tim@kali:~$ sudo ssh-keygen
tim@kali:~$ sudo -u jenkins ssh-keygen
tim@kali:~$ cat ~/.ssh/id_rsa.pub | sudo -u git tee -a /home/git/.ssh/authorized_keys
tim@kali:~$ sudo -u jenkins cat /home/jenkins/.ssh/id_rsa.pub | sudo -u git tee -a /home/git/.ssh/authorized_keys
tim@kali:~$ mkdir repo && cd repo
tim@kali:~/repo$ git init
tim@kali:~/repo$ vi Jenkinsfile
tim@kali:~/repo$ git add .
tim@kali:~/repo$ git commit
tim@kali:~/repo$ git remote add origin git@localhost:repo
tim@kali:~/repo$ git push --set-upstream origin master
You should now be able to successfully run the Pipeline demos here:
https://jenkins.io/doc/pipeline/tour/hello-world/
You can set the Git server in Jenkins as git@localhost:repo and it will work the same as a remote Git server (BitBucket etc).
As this is for testing purposes, if you reboot you'll have to start SSH and Jenkins again manually.
Install Docker
Add the Docker package certificate:tim@kali:~$ curl -fsSL https://download.docker.com/linux/debian/gpg | sudo apt-key add -
If we try to use add-apt-respository we will get an error as Kali is not supported:
tim@kali:~$ sudo add-apt-repository "deb [arch=amd64] https://download.docker.com/linux/debian stretch stable"
aptsources.distro.NoDistroTemplateException: Error: could not find a distribution template for Kali/kali-rolling
We can instead manually add to /etc/apt/sources.list:
tim@kali:~$ sudo vi /etc/apt/sources.list
deb [arch=amd64] https://download.docker.com/linux/debian stretch stable
tim@kali:~$ sudo apt-get update
tim@kali:~$ sudo apt-get install docker-ce
Create users for services
We will be using key authentication or sudo so no need for passwords on the service accounts:tim@kali:~$ sudo adduser --disabled-password git
tim@kali:~$ sudo adduser --disabled-password jenkins
We want Jenkins to be able to utilise Docker without having to be root:
tim@kali:~$ sudo adduser jenkins docker
Download and run Jenkins
When testing I prefer this method over the Debian package as it is all self-contained:tim@kali:~$ sudo -u jenkins -i
jenkins@kali:~$ mkdir ~/jenkins && cd ~/jenkins
jenkins@kali:~/jenkins$ wget "http://mirrors.jenkins.io/war-stable/latest/jenkins.war"
jenkins@kali:~/jenkins$ java -jar jenkins.war --httpPort=8080
Set up Git remote
This will set up a repo you can access over SSH:tim@kali:~$ sudo apt-get install git-core
tim@kali:~$ sudo systemctl start ssh
tim@kali:~$ sudo -u git -i
git@kali:~$ mkdir ~/.ssh ~/repo
git@kali:~$ chmod 0700 ~/.ssh
git@kali:~$ cd ~/repo
git@kali:~/repo$ git init --bare
Set up SSH keys
Create keys for your user and the Jenkins user and add to Git's authorized_keys file:tim@kali:~$ sudo ssh-keygen
tim@kali:~$ sudo -u jenkins ssh-keygen
tim@kali:~$ cat ~/.ssh/id_rsa.pub | sudo -u git tee -a /home/git/.ssh/authorized_keys
tim@kali:~$ sudo -u jenkins cat /home/jenkins/.ssh/id_rsa.pub | sudo -u git tee -a /home/git/.ssh/authorized_keys
Set up local Git repo
Push your test Jenkinsfile to the remote repo:tim@kali:~$ mkdir repo && cd repo
tim@kali:~/repo$ git init
tim@kali:~/repo$ vi Jenkinsfile
tim@kali:~/repo$ git add .
tim@kali:~/repo$ git commit
tim@kali:~/repo$ git remote add origin git@localhost:repo
tim@kali:~/repo$ git push --set-upstream origin master
You should now be able to successfully run the Pipeline demos here:
https://jenkins.io/doc/pipeline/tour/hello-world/
You can set the Git server in Jenkins as git@localhost:repo and it will work the same as a remote Git server (BitBucket etc).
As this is for testing purposes, if you reboot you'll have to start SSH and Jenkins again manually.
Tuesday, 1 August 2017
Solution to Error 0x80070714 when attempting to upgrade to Windows 10 version 1703 (Creators Update)
I was attempting to patch a Windows 10 Pro machine from version 1607 to 1703 (Creators Update), however the process kept failing with Error 0x80070714:
Feature update to Windows 10, version 1703 - Error 0x80070714
The solution was to stop the MSSQLSERVER service before kicking off the update:
Right-click the Start button (or press Windows+X) and choose "Command Prompt (Admin)" then type the following:
C:\WINDOWS\system32>net stop MSSQLSERVER
The SQL Server (MSSQLSERVER) service is stopping.
The SQL Server (MSSQLSERVER) service was stopped successfully.
Once the machine reboots after the update the service will be running again, so this shouldn't do any harm.
You may have other MSSQL instances with different service names, the same process applies.
Feature update to Windows 10, version 1703 - Error 0x80070714
The solution was to stop the MSSQLSERVER service before kicking off the update:
Right-click the Start button (or press Windows+X) and choose "Command Prompt (Admin)" then type the following:
C:\WINDOWS\system32>net stop MSSQLSERVER
The SQL Server (MSSQLSERVER) service is stopping.
The SQL Server (MSSQLSERVER) service was stopped successfully.
Once the machine reboots after the update the service will be running again, so this shouldn't do any harm.
You may have other MSSQL instances with different service names, the same process applies.
Monday, 10 July 2017
Down the OVA compatibility rabbit hole
I recently volunteered to create a B2R CTF for SecTalks_BNE. It was fairly simple to create the content within the machine, however I came across a few hurdles when trying to make the machine as portable as possible. I wanted it to be easily usable on VirtualBox as well as VMware Fusion, Player and Workstation.
Before embarking on this project I had foolishly assumed I could just create the VM in VirtualBox and then "Export Appliance..." to create a portable OVA. If only it were that simple!
The OVA files that were created by VirtualBox worked fine by other VirtualBox users, but VMware users were getting various levels of success; Fusion wouldn't play nice at all.
I've created this post so that I remember what to do again down the track, and as a side bonus hopefully someone else will benefit or learn from it!
The OVF (Open Virtualisation Format) specifies the configuration of the virtual machine. The disk images contain data held by the virtual drives.
After creating a few OVA files from ESXi, my testing concluded that VirtualBox happily accepted a VMware OVA but VMware had a hard time working with a VirtualBox OVA.
One solution would be to do all my development on ESXi, but I quite like using VirtualBox on my laptop!
I then unpacked said OVA, prepared the replacement disk image with VirtualBox and rolled my own OVA using a few commands.
The initial OVA contained the following:
$ tar xvf covfefe.ova
covfefe.ovf
covfefe.mf
disk-0.vmdk
To prepare the replacement disk-0.vmdk file, I ran through the steps in my earlier blog post and converted from VDI to VMDK with clonemedium (also mentioned in the same post).
After replacing the VMDK file, I edited the size entry in the OVF to reflect the new file:
<File ovf:href="disk-0.vmdk" ovf:id="file1" ovf:size="464093696"/>
Once I finished editing the OVF I had to create the correct checksums to use in the manifest file:
$ shasum covfefe.ovf disk-0.vmdk
249eef04df64f45a185e809e18fb285cadfcd6f0 covfefe.ovf
ae1718beb7d5eb7dfb5158718b0eceda812512a2 disk-0.vmdk
After the changes my manifest file looked like this:
$ cat covfefe.mf
SHA1 (covfefe.ovf)= 249eef04df64f45a185e809e18fb285cadfcd6f0
SHA1 (disk-0.vmdk)= ae1718beb7d5eb7dfb5158718b0eceda812512a2
I then reassembled the OVA file:
$ tar cf covfefe.ova covfefe.ovf covfefe.mf disk-0.vmdk
Just as a test I also did the assembly using OVF Tool as it did some extra checks while assembling:
$ /Applications/VMware\ OVF\ Tool/ovftool covfefe.ovf covfefe.ova
The OVA has worked flawlessly on everything I've tested it on so far which is VirtualBox 5.1.22, VMware ESXi 6.5, Fusion 8.5.8 and Player 6.0.1.
Before embarking on this project I had foolishly assumed I could just create the VM in VirtualBox and then "Export Appliance..." to create a portable OVA. If only it were that simple!
The OVA files that were created by VirtualBox worked fine by other VirtualBox users, but VMware users were getting various levels of success; Fusion wouldn't play nice at all.
I've created this post so that I remember what to do again down the track, and as a side bonus hopefully someone else will benefit or learn from it!
Let me explain some acronyms first
An OVA file is an Open Virtualisation Appliance. It's essentially a tarball containing an OVF, one or more disk images (usually VMDK files) and a manifest (checksum) file.The OVF (Open Virtualisation Format) specifies the configuration of the virtual machine. The disk images contain data held by the virtual drives.
Gathering test data
To get some VMware test data I dragged my old HP N54L out of the cupboard and installed ESXi 6.5 on it. The disk performance was horrendously slow until I disabled the problematic AHCI driver as per this blog.After creating a few OVA files from ESXi, my testing concluded that VirtualBox happily accepted a VMware OVA but VMware had a hard time working with a VirtualBox OVA.
My VirtualBox solution
I decided to keep things simple and use ESXi to generate the initial OVA. I chose to target VMware 4 to keep it compatible with pretty much everything. After this step ESXi was no longer required.I then unpacked said OVA, prepared the replacement disk image with VirtualBox and rolled my own OVA using a few commands.
The initial OVA contained the following:
$ tar xvf covfefe.ova
covfefe.ovf
covfefe.mf
disk-0.vmdk
To prepare the replacement disk-0.vmdk file, I ran through the steps in my earlier blog post and converted from VDI to VMDK with clonemedium (also mentioned in the same post).
After replacing the VMDK file, I edited the size entry in the OVF to reflect the new file:
<File ovf:href="disk-0.vmdk" ovf:id="file1" ovf:size="464093696"/>
Once I finished editing the OVF I had to create the correct checksums to use in the manifest file:
$ shasum covfefe.ovf disk-0.vmdk
249eef04df64f45a185e809e18fb285cadfcd6f0 covfefe.ovf
ae1718beb7d5eb7dfb5158718b0eceda812512a2 disk-0.vmdk
After the changes my manifest file looked like this:
$ cat covfefe.mf
SHA1 (covfefe.ovf)= 249eef04df64f45a185e809e18fb285cadfcd6f0
SHA1 (disk-0.vmdk)= ae1718beb7d5eb7dfb5158718b0eceda812512a2
I then reassembled the OVA file:
$ tar cf covfefe.ova covfefe.ovf covfefe.mf disk-0.vmdk
Just as a test I also did the assembly using OVF Tool as it did some extra checks while assembling:
$ /Applications/VMware\ OVF\ Tool/ovftool covfefe.ovf covfefe.ova
The OVA has worked flawlessly on everything I've tested it on so far which is VirtualBox 5.1.22, VMware ESXi 6.5, Fusion 8.5.8 and Player 6.0.1.
Prepping a Linux VM for OVA export
These are the steps I recommend to prepare a Linux VM for OVA export. It should keep the size down to a minimum and prevent headaches and confusion down the track!
I'm using VirtualBox but the info applies to VMware. You'll just have to read the VMware documentation for the compacting section.
I am running these commands from a Debian Stretch live CD inside the guest, and have mounted the destination filesystem (/dev/sda1) as /mnt:
$ sudo mount /dev/sda1 /mnt
I disable this by adding the kernel parameter "net.ifnames=0", you can do this within /mnt/etc/default/grub:
GRUB_CMDLINE_LINUX="net.ifnames=0"
Then run update-grub from within a chroot:
$ sudo mount --bind /dev /mnt/dev
$ sudo mount --bind /proc /mnt/proc
$ sudo mount --bind /sys /mnt/sys
$ sudo chroot /mnt
# update-grub
# exit
$ sudo umount /mnt/dev /mnt/proc /mnt/sys
You'll now want to adjust /etc/network/interfaces (or equivalent) accordingly to reflect eth0 instead of enp0s17 or whatever.
$ sudo find /mnt/var/log -type f -exec sh -c 'cat /dev/null > {}' \;
$ sudo umount /mnt
$ sudo e2fsck -E discard /dev/sda1
If you're using a VDI file, you can use modifymedium --compact:
https://www.virtualbox.org/manual/ch08.html#vboxmanage-modifyvdi
If you're using a VMDK file, you can use clonemedium:
https://www.virtualbox.org/manual/ch08.html#vboxmanage-clonevdi
I'm using VirtualBox but the info applies to VMware. You'll just have to read the VMware documentation for the compacting section.
I am running these commands from a Debian Stretch live CD inside the guest, and have mounted the destination filesystem (/dev/sda1) as /mnt:
$ sudo mount /dev/sda1 /mnt
Disable systemd from renaming network interfaces
If you leave this enabled, you'll have different network interface names for VirtualBox and VMware so your interface definitions won't work in both!I disable this by adding the kernel parameter "net.ifnames=0", you can do this within /mnt/etc/default/grub:
GRUB_CMDLINE_LINUX="net.ifnames=0"
Then run update-grub from within a chroot:
$ sudo mount --bind /dev /mnt/dev
$ sudo mount --bind /proc /mnt/proc
$ sudo mount --bind /sys /mnt/sys
$ sudo chroot /mnt
# update-grub
# exit
$ sudo umount /mnt/dev /mnt/proc /mnt/sys
You'll now want to adjust /etc/network/interfaces (or equivalent) accordingly to reflect eth0 instead of enp0s17 or whatever.
Sanitise the log directory
Nuke the contents but leave files in place:$ sudo find /mnt/var/log -type f -exec sh -c 'cat /dev/null > {}' \;
Discard unallocated blocks
Unmount the filesystem then discard unallocated blocks:$ sudo umount /mnt
$ sudo e2fsck -E discard /dev/sda1
Compact the disk image
This is done from the host, not the guest.If you're using a VDI file, you can use modifymedium --compact:
https://www.virtualbox.org/manual/ch08.html#vboxmanage-modifyvdi
If you're using a VMDK file, you can use clonemedium:
https://www.virtualbox.org/manual/ch08.html#vboxmanage-clonevdi
Wednesday, 26 April 2017
Installing Raspbian on the Raspberry Pi 3 using raspbian-ua-netinst
I really like using the Raspbian unattended netinstaller (raspbian-ua-netinst) for doing headless installs of Raspbian to Raspberry Pi devices. You pretty much write the installer image to SD, create a configuration file, then insert the SD into the Pi and let it do the rest.
I wasn't able to install Raspbian to my Raspberry Pi 3 using the current latest build (1.0.9) of raspbian-ua-netinst as it still lacks support for this newer hardware.
Below is a quick guide on what I did to get it up and running successfully. I ran this from a Raspberry Pi but you could just as easily use any Linux machine:
Pull down the v1.1.x branch from GitHub:
$ git clone -b v1.1.x https://github.com/debian-pi/raspbian-ua-netinst.git
Download and build:
$ cd raspbian-ua-netinst
$ ./build.sh
Create the images you can then write to SD, this requires root for the loopback setup:
$ sudo ./buildroot.sh
If using a Raspberry Pi with limited swap like myself, you may get an error when creating the xz archive due to it being unable to allocate sufficient memory to xz. It's no problem as you can use the uncompressed or bz2 image.
As an example you could run bzcat raspbian-ua-netinst-20170426-gited24416.img.bz2 redirected to the destination SD card (the card itself, not a partition device).
Hopefully this post will be redundant soon when a newer raspbian-ua-netinst is released with Raspberry Pi 3 support, but until then I hope this is useful to someone!
I wasn't able to install Raspbian to my Raspberry Pi 3 using the current latest build (1.0.9) of raspbian-ua-netinst as it still lacks support for this newer hardware.
Below is a quick guide on what I did to get it up and running successfully. I ran this from a Raspberry Pi but you could just as easily use any Linux machine:
Pull down the v1.1.x branch from GitHub:
$ git clone -b v1.1.x https://github.com/debian-pi/raspbian-ua-netinst.git
Download and build:
$ cd raspbian-ua-netinst
$ ./build.sh
Create the images you can then write to SD, this requires root for the loopback setup:
$ sudo ./buildroot.sh
If using a Raspberry Pi with limited swap like myself, you may get an error when creating the xz archive due to it being unable to allocate sufficient memory to xz. It's no problem as you can use the uncompressed or bz2 image.
As an example you could run bzcat raspbian-ua-netinst-20170426-gited24416.img.bz2 redirected to the destination SD card (the card itself, not a partition device).
Hopefully this post will be redundant soon when a newer raspbian-ua-netinst is released with Raspberry Pi 3 support, but until then I hope this is useful to someone!
Subscribe to:
Posts (Atom)