Sunday, 12 February 2023

Replacing the bootloader and installing Klipper firmware on a Cocoon Create 3D Printer V1

This process outlines the steps to replace the bootloader and firmware on an ALDI Cocoon Create 3D Printer V1. It also applies to the Wanhao Duplicator i3 V2, which the ALDI printer is based on:

Both ship with Repetier 0.91 firmware and use the Melzi controller board.

The Melzi utilises an 8-bit AVR MCU with 128K of flash (ATmega1284P).

Dumping standard firmware

Before overwriting the bootloader or flash, I wanted to dump the existing flash so I could back out of changes if I wanted to go back to the original firmware.

I first tried using avrdude 6.3 on OctoPi via standard USB interface:

$ avrdude -p m1284p -c arduino -P /dev/serial/by-id/usb-FTDI_FT232R_USB_UART_AI03KF0Y-if00-port0 -v

avrdude: stk500_getsync() attempt 1 of 10: not in sync: resp=0xac

The printer likely has a bootloader that doesn't support updates via USB.

I then moved to using a Bus Pirate v3.6 running community firmware connected to the ISP pins on the Melzi board, and used avrdude 6.4 on macOS 12.1:

% avrdude -p m1284p -c buspirate -P /dev/tty.usbserial-AJ02XIK6 -v

avrdude: Device signature = 0x1e9705 (probably m1284p)

avrdude: safemode: lfuse reads as D6

avrdude: safemode: hfuse reads as DC

avrdude: safemode: efuse reads as FD

I had no problem dumping EEPROM:

% avrdude -p m1284p -c buspirate -P /dev/tty.usbserial-AJ02XIK6 -U eeprom:r:eeprom.bin:r

Dumping flash read would fail at 99%:

BusPirate: Paged Read command returned zero.

After some reading of the datasheet, lock bits probably set to prevent reading bootloader, read the lock bits, the value was 0xCF.

I was able to dump flash (minus bootloader area) without errors with paged read mode disabled, although it was much slower:

% avrdude -p m1284p -c buspirate -P /dev/tty.usbserial-AJ02XIK6 -U flash:r:flash.bin:r -x nopagedread

Flashing Optiboot bootloader

You could leave the original bootloader in place but it would mean you would need to do all firmware updates via the ISP.

Downloaded the suggested Optiboot bootloader mentioned in the Klipper documentation.

Optiboot much smaller than original bootloader, so had to adjust high byte fuse (hfuse) to suit:

% avrdude -p m1284p -c buspirate -P /dev/tty.usbserial-AJ02XIK6 -U hfuse:w:0xDE:m

See table 25-4 on page 293 of the datasheet for more details on the high byte fuse.

This shouldn't affect going back to the standard firmware as the bootloader code is at the end of the flash, so it just starts at a higher memory address than usual:

% avrdude -p m1284p -c buspirate -P /dev/tty.usbserial-AJ02XIK6 -U flash:w:optiboot_atmega1284p.hex:i

Set lock bits back to original value to stop bootloader from accidental damage:

% avrdude -p m1284p -c buspirate -P /dev/tty.usbserial-AJ02XIK6 -U lock:w:0xCF:m

Flashing can now be done via standard USB interface on printer.

Testing new bootloader with standard firmware

Make sure you use -D flag when programming application area via the ISP or you will need to reflash the bootloader again with the steps above

% avrdude -p m1284p -c buspirate -D -P /dev/tty.usbserial-AJ02XIK6 -U flash:w:flash.bin:r

Booted successfully and although I did not try a test print I was able to control steppers.

Flashing Klipper

Used standard USB interface on printer connected to OctoPi and followed the installation instructions.


Monday, 7 October 2019

Enabling AirPrint to legacy HP LaserJet printers using Debian 10

This guide will hopefully help you get AirPrint working on older HP LaserJet devices that do not natively support it.

On your Debian 10 server, install avahi-daemon (Bonjour) and CUPS (print queue) servers:

$ sudo apt install avahi-daemon cups

Add printer queue, replacing your.printer.hostname with host or IP of your printer, and set the description (-D) to whatever you want:

$ sudo lpadmin -p hp -D "HP LaserJet M1522nf MFP" -E -m drv:///sample.drv/laserjet.ppd -v socket://your.printer.hostname

Check if the sharing capability is enabled within CUPS and if not, enable it:

$ sudo cupsctl | grep share
_share_printers=0
$ sudo cupsctl --share-printers

Also enable sharing for the queue itself:

$ sudo lpadmin -p hp -o printer-is-shared=true

You can check the default settings for the printer using lpoptions. The defaults are displayed with an asterisk next to them:

$ lpoptions -d hp -l
PageSize/Media Size: *Letter Legal Executive Tabloid A3 A4 A5 B5 EnvISOB5 Env10 EnvC5 EnvDL EnvMonarch
Resolution/Resolution: 150dpi *300dpi 600dpi
InputSlot/Media Source: *Default Tray1 Tray2 Tray3 Tray4 Manual Envelope
Duplex/2-Sided Printing: *None DuplexNoTumble DuplexTumble
Option1/Duplexer: *False True

Here I have changed the paper size and default resolution systemwide:

$ sudo lpadmin -p hp -o PageSize=A4
$ sudo lpadmin -p hp -o Resolution=600dpi

You should now be able to see the mDNS entries using avahi-browse (in the avahi-utils package):

$ avahi-browse -at | grep -i hp
+   eth0 IPv6 HP LaserJet M1522nf MFP @ server              UNIX Printer         local
+   eth0 IPv4 HP LaserJet M1522nf MFP @ server              UNIX Printer         local
+   eth0 IPv6 HP LaserJet M1522nf MFP @ server              Secure Internet Printer local
+   eth0 IPv4 HP LaserJet M1522nf MFP @ server              Secure Internet Printer local
+   eth0 IPv6 HP LaserJet M1522nf MFP @ server              Internet Printer     local
+   eth0 IPv4 HP LaserJet M1522nf MFP @ server              Internet Printer     local

For fairly minimal effort, this setup seems to work quite well. Although printing is done via AppSocket/JetDirect, CUPS is smart enough to talk to the printer via SNMP to find out the printer status such as low toner or any errors. If it isn't already obvious, the Debian server will need to be on for the AirPrint function to work!

Wednesday, 28 November 2018

Hardening Samba

This post details how you can set up your Samba server to be a bit more resilient than the defaults.

The Samba server security page gives information on using the hosts allow/deny directives, interface binding configuration, and keeping up-to-date, so I'm not going to mention those things here.

I am however going to jump into a few other directives.

First of all, there's no good reason to give out the server's version, so my server replies with "Samba".

I mandate SMB2 as the minimum required protocol, and enforce signing. I really recommend you do this and so does Microsoft. Without mandating signing you are leaving yourself open to man-in-the-middle attacks. These settings will work with clients on Windows 7 and newer, and any non-ancient Linux/macOS.

I'm using the "standalone server" server role, so I can disable NetBIOS completely, and without NetBIOS and SMB1 there's no need to listen on anything other than TCP/445.

Here are smb.conf server directives to get you started with those changes:

[global]
        server string = Samba
        disable netbios = Yes
        server min protocol = SMB2
        smb ports = 445
        server signing = required

In addition to the above, you should consider disabling anonymous authentication.

With anonymous authentication enabled (the default), anyone can specify a blank user and password to view shares and other information, and talk to IPC$:

user@client:~$ smbclient -m SMB2 -L server -U ''
Enter 's password:

        Sharename       Type      Comment
        ---------       ----      -------
        share           Disk
        IPC$            IPC       IPC Service (Samba)
Connection to server failed (Error NT_STATUS_CONNECTION_REFUSED)
NetBIOS over TCP disabled -- no workgroup available

To disable this, you can set restrict anonymous in smb.conf:

[global]
        restrict anonymous = 2

Restart Samba:

admin@server:~$ sudo systemctl restart smbd

You'll now be denied if you use blank credentials:

user@client:~$ smbclient -m SMB2 -L server -U ''
Enter 's password:
tree connect failed: NT_STATUS_ACCESS_DENIED

One other thing I'll mention is my tendency to add a "valid users" line to each share, and whitelist just the users/groups requiring permission.

Thanks for reading!

Sunday, 25 November 2018

Electric bike build part 6

Continued from Electric bike build part 5.

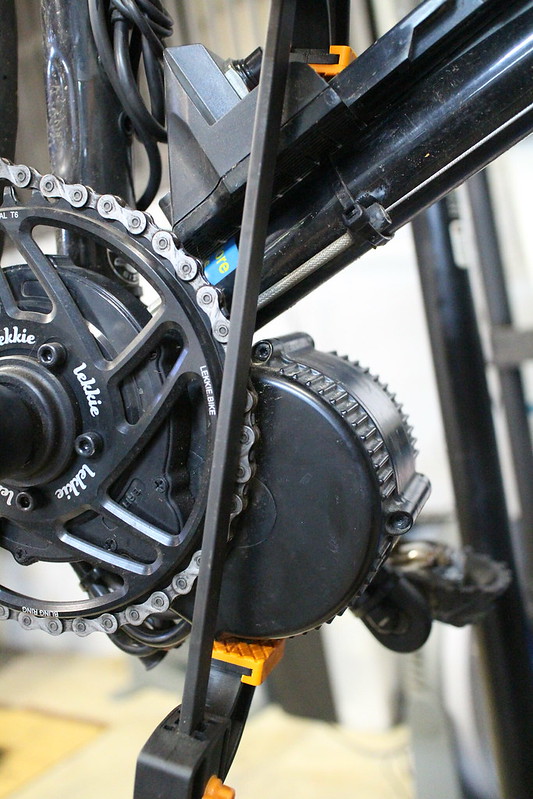
My electric bike has almost hit 2,400km and only just now has required another re-torque of the motor. I haven't had any other issues other than a bit of rubbing from the 28mm tyres - it's really touch and go with this frame and I've been told the GP4000 tyres are fatter than advertised.


It looks like the rubber has been completely wiped out by motor movement:


A clamp came in handy to hold the motor in place while doing the re-torque:


Thread locker applied again to both rings:


I used the spanner through an old shirt to keep the alloy lock ring looking pretty:


I still think it's an awesome machine and a great way to commute! No regrets!

All I can think of is if I had to do it all over again I'd look at a bike with disc brakes and a bit more clearance for wider tyres so I can run lower pressures, but I'm in no rush to make the change.

Wednesday, 12 September 2018

Plex hardware accelerated transcoding within LXC

I run Plex Media Server within an LXC container on my NAS. The NAS itself is a QNAP TS-251+ but it is running Debian 9. I have all the functions I use separated into individual LXC containers.

Plex runs quite well considering the low powered Celeron J1900 processor, but it does tend to struggle with HD transcoding. I managed to get GPU assisted transcoding working this evening which appears to help considerably!

Here are the requirements:
https://support.plex.tv/articles/115002178853-using-hardware-accelerated-streaming/

Fortunately the Celeron J1900 supports Intel Quick Sync Video.

First of all I checked the host could see the DRI stuff:

tim@host:~$ journalctl
Jul 16 21:29:30 jupiter kernel: [drm] Initialized i915 1.6.0 20160919 for 0000:00:02.0 on minor 0

tim@host:~$ ls -l /dev/dri
total 0
crw-rw---- 1 root video 226,   0 Jul 16 21:29 card0
crw-rw---- 1 root video 226,  64 Jul 16 21:29 controlD64
crw-rw---- 1 root video 226, 128 Jul 16 21:29 renderD128

I then tried mapping the devices through to the container:

tim@host:~$ sudo vi /var/lib/lxc/plex/config
...
lxc.mount.entry = /dev/dri dev/dri none bind,create=dir 0 0

I restarted the container then installed the relevant driver and the vainfo program within it:

tim@plex:~$ sudo apt-get install i965-va-driver vainfo

Both the Plex user and my user were in the video group yet vainfo was just saying 'Abort' instead of giving any useful info. I did some further digging:

tim@plex:~$ strace vainfo
...
open("/dev/dri/renderD128", O_RDWR)     = -1 EPERM (Operation not permitted)
open("/dev/dri/card0", O_RDWR)          = -1 EPERM (Operation not permitted)
...

The container did not have permissions to talk to those devices.

I did a bit of reading on control groups and device numbers and came up with the following rule to allow the container to use any character device with a major number of 226 (Direct Rendering Infrastructure):

tim@host:~$ sudo vi /var/lib/lxc/plex/config
...
lxc.cgroup.devices.allow = c 226:* rw
lxc.mount.entry = /dev/dri dev/dri none bind,create=dir 0 0

After stopping and starting the container, I could now run vainfo successfully:

tim@plex:~$ vainfo
error: XDG_RUNTIME_DIR not set in the environment.
error: can't connect to X server!
libva info: VA-API version 0.39.4
libva info: va_getDriverName() returns 0
libva info: Trying to open /usr/lib/x86_64-linux-gnu/dri/i965_drv_video.so
libva info: Found init function __vaDriverInit_0_39
libva info: va_openDriver() returns 0
vainfo: VA-API version: 0.39 (libva 1.7.3)
vainfo: Driver version: Intel i965 driver for Intel(R) Bay Trail - 1.7.3
vainfo: Supported profile and entrypoints
      VAProfileMPEG2Simple            : VAEntrypointVLD
      VAProfileMPEG2Simple            : VAEntrypointEncSlice
      VAProfileMPEG2Main              : VAEntrypointVLD
      VAProfileMPEG2Main              : VAEntrypointEncSlice
      VAProfileH264ConstrainedBaseline: VAEntrypointVLD
      VAProfileH264ConstrainedBaseline: VAEntrypointEncSlice
      VAProfileH264Main               : VAEntrypointVLD
      VAProfileH264Main               : VAEntrypointEncSlice
      VAProfileH264High               : VAEntrypointVLD
      VAProfileH264High               : VAEntrypointEncSlice
      VAProfileH264StereoHigh         : VAEntrypointVLD
      VAProfileVC1Simple              : VAEntrypointVLD
      VAProfileVC1Main                : VAEntrypointVLD
      VAProfileVC1Advanced            : VAEntrypointVLD
      VAProfileNone                   : VAEntrypointVideoProc
      VAProfileJPEGBaseline           : VAEntrypointVLD

Monday, 7 May 2018

Jenkins on Kali 2017.1

Here's a quick run through of getting the Jenkins Pipeline demos working on Kali 2017.1 for testing purposes.

Install Docker

Add the Docker package certificate:
tim@kali:~$ curl -fsSL https://download.docker.com/linux/debian/gpg | sudo apt-key add -

If we try to use add-apt-respository we will get an error as Kali is not supported:
tim@kali:~$ sudo add-apt-repository "deb [arch=amd64] https://download.docker.com/linux/debian stretch stable"
aptsources.distro.NoDistroTemplateException: Error: could not find a distribution template for Kali/kali-rolling

We can instead manually add to /etc/apt/sources.list:
tim@kali:~$ sudo vi /etc/apt/sources.list
deb [arch=amd64] https://download.docker.com/linux/debian stretch stable
tim@kali:~$ sudo apt-get update
tim@kali:~$ sudo apt-get install docker-ce

Create users for services

We will be using key authentication or sudo so no need for passwords on the service accounts:
tim@kali:~$ sudo adduser --disabled-password git
tim@kali:~$ sudo adduser --disabled-password jenkins

We want Jenkins to be able to utilise Docker without having to be root:
tim@kali:~$ sudo adduser jenkins docker

Download and run Jenkins

When testing I prefer this method over the Debian package as it is all self-contained:
tim@kali:~$ sudo -u jenkins -i
jenkins@kali:~$ mkdir ~/jenkins && cd ~/jenkins
jenkins@kali:~/jenkins$ wget "http://mirrors.jenkins.io/war-stable/latest/jenkins.war"
jenkins@kali:~/jenkins$ java -jar jenkins.war --httpPort=8080

Set up Git remote

This will set up a repo you can access over SSH:
tim@kali:~$ sudo apt-get install git-core
tim@kali:~$ sudo systemctl start ssh
tim@kali:~$ sudo -u git -i
git@kali:~$ mkdir ~/.ssh ~/repo
git@kali:~$ chmod 0700 ~/.ssh
git@kali:~$ cd ~/repo
git@kali:~/repo$ git init --bare

Set up SSH keys

Create keys for your user and the Jenkins user and add to Git's authorized_keys file:
tim@kali:~$ sudo ssh-keygen
tim@kali:~$ sudo -u jenkins ssh-keygen
tim@kali:~$ cat ~/.ssh/id_rsa.pub | sudo -u git tee -a /home/git/.ssh/authorized_keys
tim@kali:~$ sudo -u jenkins cat /home/jenkins/.ssh/id_rsa.pub | sudo -u git tee -a /home/git/.ssh/authorized_keys

Set up local Git repo

Push your test Jenkinsfile to the remote repo:
tim@kali:~$ mkdir repo && cd repo
tim@kali:~/repo$ git init
tim@kali:~/repo$ vi Jenkinsfile
tim@kali:~/repo$ git add .
tim@kali:~/repo$ git commit
tim@kali:~/repo$ git remote add origin git@localhost:repo
tim@kali:~/repo$ git push --set-upstream origin master

You should now be able to successfully run the Pipeline demos here:
https://jenkins.io/doc/pipeline/tour/hello-world/

You can set the Git server in Jenkins as git@localhost:repo and it will work the same as a remote Git server (BitBucket etc).

As this is for testing purposes, if you reboot you'll have to start SSH and Jenkins again manually.

Tuesday, 1 August 2017

Solution to Error 0x80070714 when attempting to upgrade to Windows 10 version 1703 (Creators Update)

I was attempting to patch a Windows 10 Pro machine from version 1607 to 1703 (Creators Update), however the process kept failing with Error 0x80070714:

Feature update to Windows 10, version 1703 - Error 0x80070714

The solution was to stop the MSSQLSERVER service before kicking off the update:

Right-click the Start button (or press Windows+X) and choose "Command Prompt (Admin)" then type the following:

C:\WINDOWS\system32>net stop MSSQLSERVER
The SQL Server (MSSQLSERVER) service is stopping.
The SQL Server (MSSQLSERVER) service was stopped successfully.


Once the machine reboots after the update the service will be running again, so this shouldn't do any harm.

You may have other MSSQL instances with different service names, the same process applies.